
USB cables all look similar from the outside, but they are not the same. A USB 2.0 and a USB 3.0 cable with the same connector shape can look identical until you know what to look for. This matters if you are troubleshooting slow transfers, checking whether a device is running at the speed you expect, or verifying your setup for wireless interference reasons.
Here is how to identify a cable visually and then confirm it with an actual speed measurement.
Visual Identification: Count the Pins
The most reliable way to tell USB 2.0 from USB 3.0 without software is to look at the connector itself.
USB 2.0: 4 pins
A standard USB-A connector on a USB 2.0 cable has four contacts inside: power, ground, and two data lines (D+ and D−). If you look into the flat end of the connector you will see a plastic tongue with four gold contacts on it.
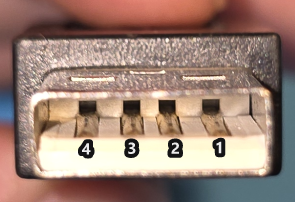
| Pin | Name | Function |
| 1 | VBUS | +5V power |
| 2 | D- | Data |
| 3 | D+ | Data |
| 4 | GND | Ground |
USB 3.0 and above: 9 pins
A USB 3.0 USB-A connector has nine contacts. The original four USB 2.0 pins are still there for backwards compatibility, plus five additional contacts for the SuperSpeed data lanes. The connector is physically deeper than a USB 2.0 plug. If you look inside you will see two rows of contacts, or a noticeably more complex arrangement than the simple four-pin USB 2.0 layout.
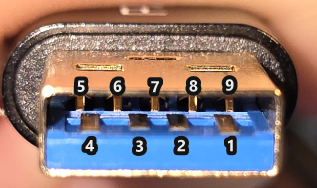
| Pin | Name | Function |
| 1 | VBUS | +5V power |
| 2 | D- | USB 2.0 data |
| 3 | D+ | USB 2.0 data |
| 4 | GND | Ground |
| 5 | StdA_SSRX- | SuperSpeed receiver |
| 6 | StdA_SSRX+ | SuperSpeed receiver |
| 7 | GND_DRAIN | Ground (signal return) |
| 8 | StdA_SSTX- | SuperSpeed transmitter |
| 9 | StdA_SSTX+ | SuperSpeed transmitter |
The blue color rule, and why it is unreliable
Many USB 3.0 ports and cables use a blue plastic insert to signal USB 3.0. This is a convention, not a standard requirement. Plenty of USB 3.0 cables ship without blue inserts, and some USB 2.0 products use blue for branding. Pin count is the definitive check.
Measuring the Speed with CrystalDiskMark
Identifying the cable visually tells you what it is capable of. Measuring tells you what it is actually doing, which can be different if the device or port at the other end limits the connection.
CrystalDiskMark is a free benchmarking tool that measures read and write speeds on any connected storage device.
What you need: a USB flash drive or external drive plugged in, CrystalDiskMark installed.
How to run the test:
- Open CrystalDiskMark, select your USB drive from the dropdown at the top
- Leave the default settings (1 run, 128 MiB works fine for a quick check)
- Click All and wait for it to finish
- Run it once with the cable or hub setup you want to test, then again with a direct connection to a USB 3.0 port for comparison
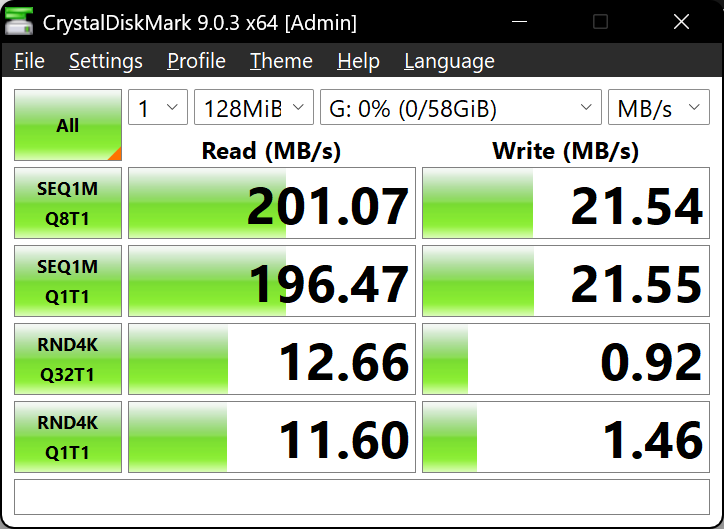
Direct connection to USB 3.0 port:
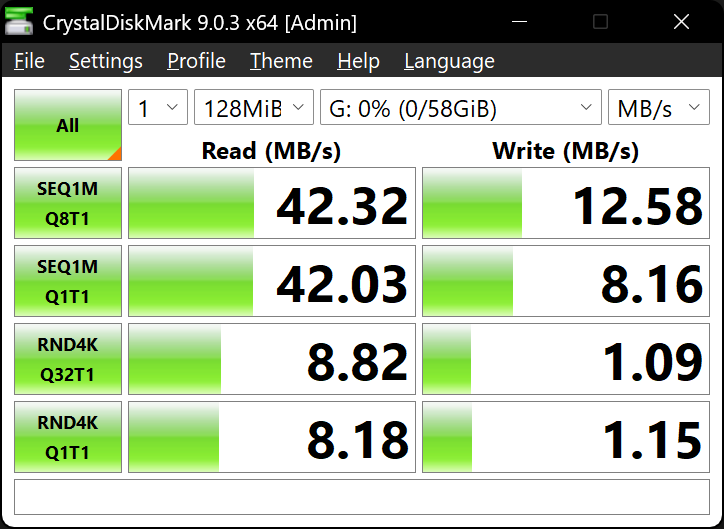
Through USB extension cable and USB 2.0 hub:
How to read the results:
Look at the SEQ1M Q8T1 Read line. That is the sequential read speed, which is the most representative number for USB throughput.
| Result | What it means |
|---|---|
| ~25 to 50 MB/s | USB 2.0 connection |
| ~150 to 400 MB/s | USB 3.0 Gen 1 (5 Gbit/s) |
| ~500 MB/s and above | USB 3.1 Gen 2 or faster |
Write speeds on flash drives are often much lower than read speeds regardless of USB version, so use read speed as your reference point.
Quick Alternative: PowerShell File Transfer Test
If you do not want to install anything, you can get a rough measurement using PowerShell and a test file.
Step 1: Create a 500 MB test file on your PC
Open PowerShell as an Administrator and run:
fsutil file createnew C:\testfile.bin 524288000
Step 2: Write to USB Test
Replace G: with your USB drive letter. Run this once with your cable or hub setup, then again with the drive plugged directly into a USB 3.0 port.
Measure-Command { Copy-Item C:\testfile.bin G:\testfile.bin }Direct connection (USB 3.0 port):
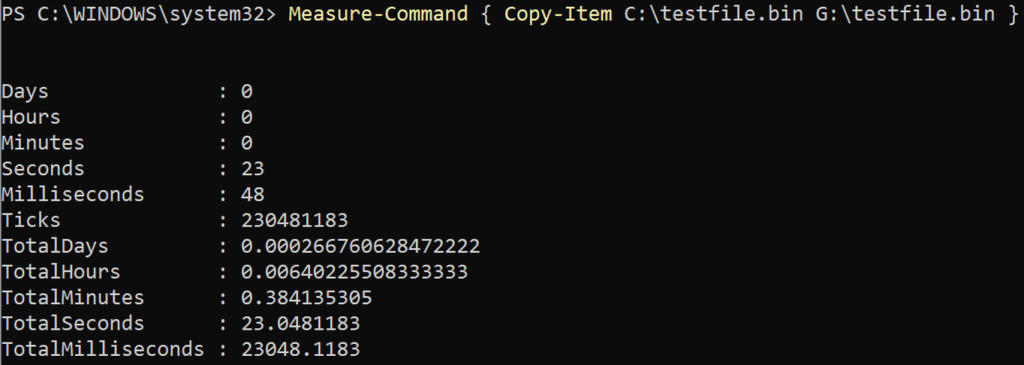
Through USB extension cable and USB 2.0 hub:
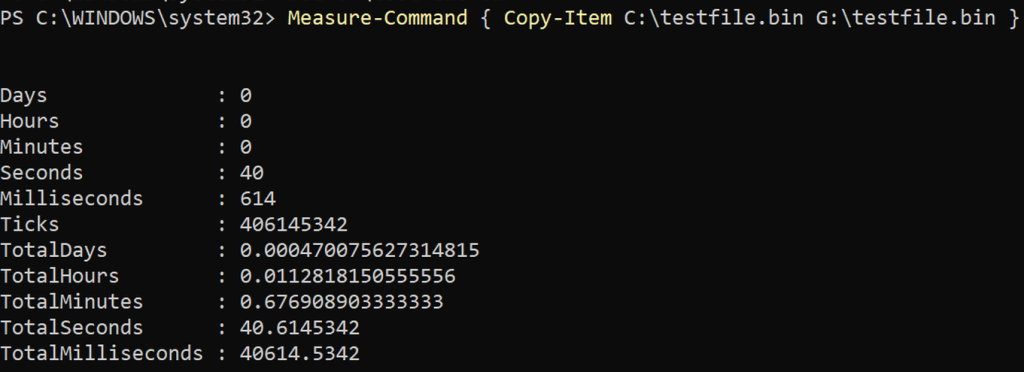
Write speed is not the ideal test here because cheap flash drives write slowly regardless of USB version, which makes the difference hard to interpret cleanly. The read direction is more reliable.
Step 3: Read From USB Test
Eject and re-insert the drive to clear the Windows file cache, otherwise Windows will return the data from RAM instead of actually reading from the device and you will get a result in the thousands of MB/s that means nothing. Then run:
Measure-Command { Copy-Item G:\testfile.bin C:\testfile_copy.bin }Direct connection (USB 3.0 port):
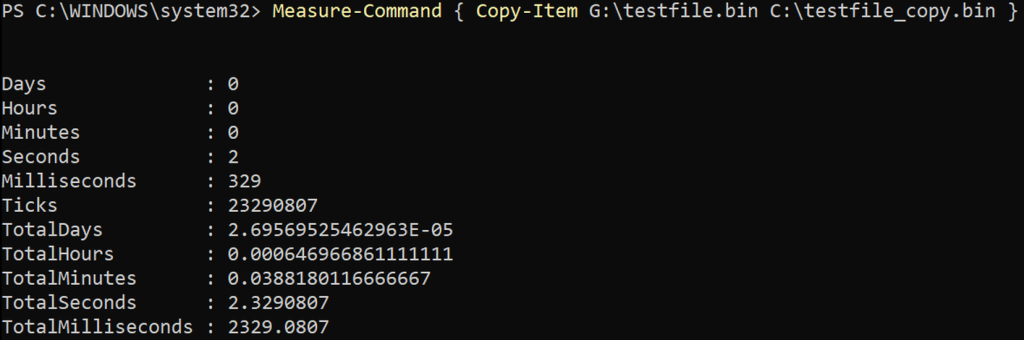
Through USB extension cable and USB 2.0 hub:
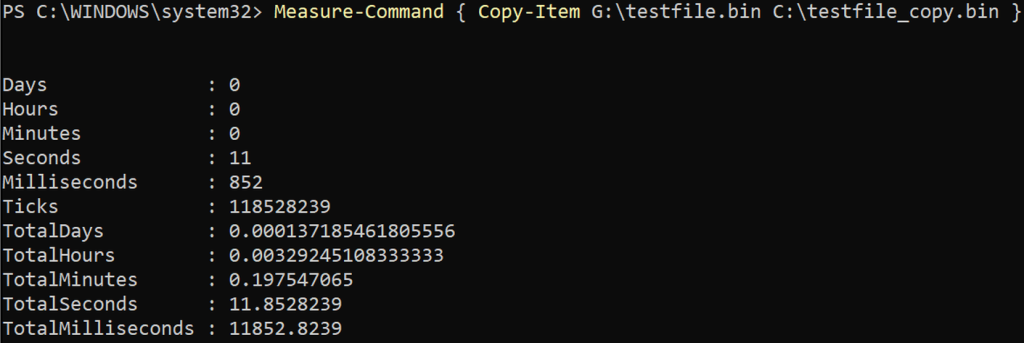
Test Results
| Test | Direct (USB 3.0) | Through Hub (USB 2.0) |
|---|---|---|
| Write | ~21.7 MB/s | ~12.3 MB/s |
| Read | ~215 MB/s | ~42 MB/s |
Clean up:
del C:\testfile.bin
del C:\testfile_copy.bin
del G:\testfile.bin
What Happens When a USB 3.0 Cable Meets a USB 2.0 Hub
This is worth knowing if you are building a setup with mixed cable and hub versions.
A USB 3.0 cable has both the four USB 2.0 wires and five additional SuperSpeed wires. When you plug it into a USB 2.0 hub, the hub and host negotiate USB 2.0. The SuperSpeed wires stay completely inactive.
The practical result: the device operates at USB 2.0 speed and the cable generates no USB 3.0 interference. It behaves like a USB 2.0 cable in every measurable way.
You can verify this with CrystalDiskMark. A USB 3.0 stick connected through a USB 3.0 cable to a USB 2.0 hub will read at around 40 MB/s, the USB 2.0 ceiling, rather than the 150 to 200 MB/s it would achieve at a direct USB 3.0 port.
Summary
- Count the pins: 4 pins is USB 2.0, 9 pins is USB 3.0 or faster
- Blue color is a common indicator but not a reliable one
- CrystalDiskMark SEQ1M Q8T1 Read gives you the definitive speed number
- The PowerShell method works without installing anything, but use the read direction, not write
- A USB 3.0 cable through a USB 2.0 hub negotiates down to USB 2.0 and behaves like one